Showing posts with label manual tips. Show all posts

Tuesday, September 15, 2015

Easy Methods to Split a Large PDF file into Multiple Pages

Earlier I was wondering for a free PDF split solution to split a large (approx. 15 MB) containing 50+ pages. I have spent my several hours to find out a suitable online PDF file splitter application. Along with the tool, I also noticed a lot of other similar tools and techniques which will make sure how to split a large PDF file into multiple pages.


I know that this is a common requirement to break a PDF file into parts to manage the files or share specific content of PDF file with friends and team members. So if you are also searching an online PDF split tool or other techniques to divide PDF file into manageable size of PDF files then this article will full fill all your needs. Here I am going to elaborate self-analyzed methods and tools for splitting a large PDF file into individual pages. 

Friday, July 3, 2015

How to Import an Outlook PST File Data into Gmail Account

Sync Outlook with Gmail IMAP account to upload Outlook contacts, emails and calendars to Gmail Id. A manual procedure for how to import an Outlook PST file into Gmail account  is elaborated with related screenshots.  You just need to do the following task which helps migrating PST files to Gmail account.

The whole task to import Outlook emails to Gmail is divided into 2 sections so far you can easily do the job without any confusion.

1) First Half Section of the Task:

Before moving to import process, enable IMAP for Gmail account and configure that Gmail account with Outlook 2013, 2010 or any older edition by using IMAP server. Check how to configure Gmail in Outlook using IMAP.

Friday, June 19, 2015

Step by Step Guide to Import PST File in Office 365 Mailbox

If you are an Outlook user and want to know how to import PST file in Office 365 then follow steps to import multiple PST files into Office 365 Mailbox without any trouble.

Recently, a friend asked to me that does office 365 use PST files and my answer was yes. Because we can read PST file emails in Office 365 by importing that PST file into Office 365 Mailbox. So in this post I am going to disclose the easiest technique to open PST file in Office 365.

The entire process to import Outlook PST file to Office 365 is divided into 2 sections so for you can easily understand how to import PST files in Office 365.

Section -1 (Requirements& Assigning Roles)

In the beginning, I want to introduce about Office 365 admin panel and prerequisites of migration that will help to understand the whole process easily.

Before starting the import process copy your PST files into a folder on a drive. Get the network path of the file by sharing it to everyone, as shown in below image:

In the very first step, login to your Office 365 account

From the Exchange admin center, grant permissions to the mailboxes for Mailbox Import Export (Not required if you have already granted this permission)


Sunday, September 28, 2014

Easily attach SQL database to the SQL Server in Few Clicks

To attach SQL database to the Server there are many way but here we discuss on easy way which saves time as well as your extra effort. Byoptimizing SQL Server Management Studio you can tremendously attach SQL database MDF file, LDF file to the SQL Server environment.

Step1: Firstly click on SSMS and then open Database Engine by filling all credential details.


Step2: Then make a click on SQL object explorer and go to database


Step3: Then make a right a right clicks on Database 

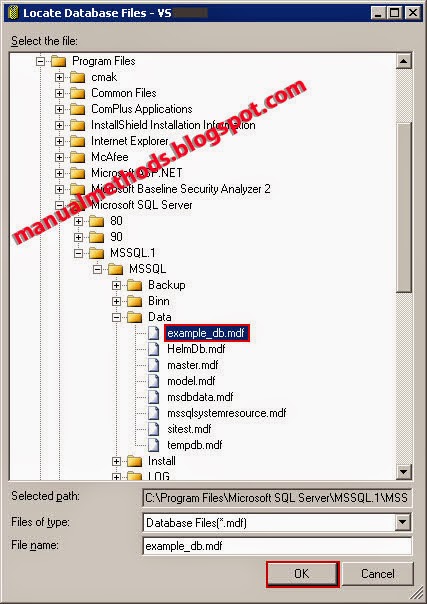
Step4: Select Attach and click on ADD Button and browse the database MDF file


Step5: On Selecting MDF File just go to Ok to complete the job

 
Step6: You can also attach SQL MDF file without LDF File by removing it after selecting MDF file also.


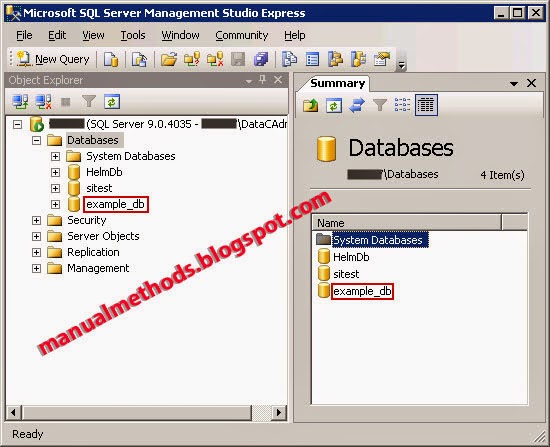
Step7: Check your attached database in a list of Database


Another Approach to attach a database by using T-SQLQuery


  1. Establish a connection with Database Engine.
  2. Just click on New Query.
  3. Type in New Query Window the below statement with For Attach close i.e
  4. CREATE DATABASE statement with the FOR ATTACH close. For example
CREATE DATABASE Mypersonalwork
    ON (FILENAME = 'C:\MSSQLServer\Mypersonalwork.mdf'), 
    (FILENAME = 'C:\MSSQLServer\Mypersonalwork_Log.ldf') 
    FOR ATTACH; 
      
Note:
You may also go with sp_attach_db or sp_attach_single_file_db stored procedure. But in future version of Microsoft SQL Server these procedures will be removed. So you must apply this approach which serves a better way to attach SQL MDF Files quickly.

Saturday, September 27, 2014

How to Import VCF File to Sony Xperia with Multiple Contacts

Are you looking solution for how to import VCF file to Sony Xperia then read this blog and follow few steps that will assist you to do so. Everyone can use this simple manual method so don’t waste your money and time in any paid solutions. Before moving on import method it is necessary to have a quick look about below few general points: 

Few Words about Sony Xperia


Xperia is the most popular smart phone of Sony ericsson loved by many users. The Xperia range was initiated by his first Android smart phone Xperia X1 in 2008 and after that released few more phones are launched in this series like: Xperia X2, X10, X8, arc,neo and acro etc .

Why User Need to Import vCard to Sony Xperia?

As we all know that contacts played a vital role in our life that helps communicating with our friends, family members, business partners and relates etc. Sometimes users desire importing VCF contacts from PC to their smart phone and think how to do so. Does not worry it’s not so difficult task to copy vCard contacts from computer to your smart phone Sony Xperia.

Easy Steps for How to Copy VCF Contacts to Sony Xperia

Step1: Connect Sony Xperia device with your computer using USB cable

 
Step2: Copy "Allcontacts.vcf" file to your android device from PC
 
Step3: Open Internal Storage Folder >> Check "Allcontacts.vcf" file is copied properly or not
 
Step4: Now find and tap contacts >> Press right click on more options >> Select "Import Contacts"
 
Step5: Now 3 options will be available such as
  • Sim Card
  • Internal Storage
  • SD Card
Select "Internal Storage" from It.

 
Step6: Select account to import vCard file i.e. Email account or Local account , Select “Local Contacts”
 
Step7: Now your device will begin searching for available vCard file formats stored in Internal Storage

 
Step8: Once the search is finished, pop-up window will come into view with available VCF files >> Select the one you desire to save in your contact list.
 
Step9: After choosing preferred VCF file, device will add contacts into phone contact list.

I think you did what you wants :) .Yet If you have any issue regarding these process then put a comment I will try to solve your query as soon as possible.