Friday, June 19, 2015

Step by Step Guide to Import PST File in Office 365 Mailbox

If you are an Outlook user and want to know how to import PST file in Office 365 then follow steps to import multiple PST files into Office 365 Mailbox without any trouble.

Recently, a friend asked to me that does office 365 use PST files and my answer was yes. Because we can read PST file emails in Office 365 by importing that PST file into Office 365 Mailbox. So in this post I am going to disclose the easiest technique to open PST file in Office 365.

The entire process to import Outlook PST file to Office 365 is divided into 2 sections so for you can easily understand how to import PST files in Office 365.

Section -1 (Requirements& Assigning Roles)

In the beginning, I want to introduce about Office 365 admin panel and prerequisites of migration that will help to understand the whole process easily.

Before starting the import process copy your PST files into a folder on a drive. Get the network path of the file by sharing it to everyone, as shown in below image:

In the very first step, login to your Office 365 account

From the Exchange admin center, grant permissions to the mailboxes for Mailbox Import Export (Not required if you have already granted this permission)


Sunday, May 31, 2015

How to Import EML File into Outlook Express – Get it Solve Now

Stops inquiring how to import EML file into Outlook express. Follow stepwise solution that will help you to import multiple EML file into Outlook express. As we all know that .eml is a format for single e-mail and accepted by many email clients such as Outlook Express, Mozilla Thunderbird, Poco Mail and The bat etc.
Here are few simple steps to import single or multiple EML file into Outlook express using drag-n-drop method.

  1. Create a new folder by pressing right click button on any existing folder >> Now Clock on New Folder
  2. Provide a desired name then Press Ok Button
  3. Go to folder where all EML file are stored in your computer >> Select required EML files (CTRL+A for entire selection)>> Drag all the selected EML files and drop into new generated folder
  4. Now open folder to access imported emails


Note: You can also import these all EML files into existing folder of Outlook express with the same process.

Monday, February 9, 2015

Google Takeout to Download Gmail Messages to My Computer


Know how Google Takeout helps to download Gmail messages to my computer. Easily backup archive (emails, contacts, notes, calendars and chat) of Gmail account.

Before moving on the backup process, it is required to know what is Google Takeout and how secure it is for downloading messages from Gmail accounts. For your information, Google Takeout is recently launched features added to Gmail application that helps us to backup Gmail data into a PC.

I am very happy to elaborate the procedure for query how to download gmail messages to my computer because the method is 100% secure and very easy to perform.

Follow Instructions to Download Gmail Messages, Contacts, Calendars etc through Google Takeout

1) In the beginning, loin to your Gmail account

2) Click on your “profile pic” from right upper section >> Now click on the “Account”

 
3) Now you will be in another tab with a new window >> Click on “Download data” from the account tool section

 
4) Select required products such as: mail, calendars and contacts, etc. (or click on Select All button to choose all products) >> Now press the Next button.
 
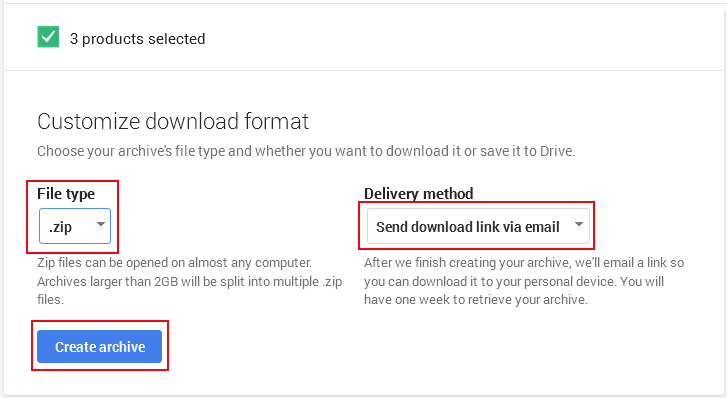
5) Now Customize download format:
  • Select “.zip” from the File Type
  • Choose “send download link via email” from the Delivery Method
6) The backup process is done now it will take some time before it is ready to download 
 
7) After a short time, an email message will be delivered automatically with the download link >> Click on the “Download Archive” button.
 
8) A last pop-up will be in front of you with complete details >> Click on “Download” button, that’s it.
 
9) Now you can see that your Gmail messages, contacts and calendars will be available on your PC in a .zip folder. Go to a download folder where .zip file is stored.
 
10) Extract all folders of .zip folder and you will find that separate folders are generated for mail, contacts and calendars. 


Note:

1) Entire mail will be downloaded in a file with .mbox extension that can be imported or opened through many desktop email clients such as: Mozilla Thunderbird, Apple Mail, Entourage, Eudora Mail, SeaMonkey and PocoMail etc. if you want to open these files in MS Outlook then you can convert MBOX files to PST format first then it will be easy to access PST files with any version of MS Outlook.

2) All contacts will be downloaded in separate .vcf(vCard) files that are supported by many email clients such as: MS Outlook, Lotus Notes, Thunderbird as well as mobile devices such as: iPhone, iPad, Blackberry, Nokia phone, Samsung, nexus, LG, Motorola etc.

3) Calendars will be stored in .ics file format which is also supported by MS Outlook and Lotus Notes etc.

Monday, December 22, 2014

How to Show Post Title First Before Blog Title in Blogger

As we all know that post title and blog title play an important role to make visible your post in search engines such as Google, Yahoo and Bing etc. Many of SEO experts explained that how post title is important to boost up your post in rank.
 
If you are a regular blogger then sometime you will notice that the blog title has shown first in search engine before the post title that can affect the ranking of the post. So no need to be panic  how to show the post title before blog title because I am going to show you an easy method to do so. Just follow given below steps to solve your query. 


Difference Between Blog Title First and Post Title Fist is Shown Below: 


Blog Title Before Post Title:


Post Title Before Blog Title:


Steps om How to Place Post Title First Before the Blog Title


1) In the very first step, Go to blogger and Login to dashboard


2) Now go to template >> Click on Edit HTML >> Proceed


3) Find this html code from the entire template

<title><data:blog.pageTitle/></title>

4) Now Replace it with given below code.

<b:if cond='data:blog.pageType == &quot;item&quot;'>
<title><data:blog.pageName/> | <data:blog.title/></title>
 <b:else/>
<title><data:blog.pageTitle/></title>
</b:if>

5) In the last step, save your template that’s it.

Conclusion: By following above trick you will able to see your Post title first before the blog title. If still you are showing same as previous then wait for a while. Once the Google re-index your post then it will automatically show post title first. If you like above suggested method or have any issue regarding the process the put a comment below, We will be there with your concern.

Wednesday, December 10, 2014

What are Mail Servers, Mail Clients and Mail Protocols

E-mailing is the most suitable approach to communicate with friends, family members, employees and colleagues, etc. For now days it becomes the first choice for professionals to sending or sharing information within organizations.

Today’s I am going to explain what techniques are used behind the emailing process. Mail servers, mail clients and mail protocols play a vital role to send or receive an email internally. So read this article and get the complete details about Mail clients, types & difference of mail clients, Mail servers, Mail protocols and types of protocols etc.  


What About Mail Server?

A mail server is a computer that is used to send, receive or store emails for its users. It’s also known as MTA (mail transfer agent), an internet mailer or a mail router that allows receiving incoming emails from local users and forwarding emails for delivery.
  1. Every ISP has at least 1 mailbox on its server.
  2. This mailbox has:
  • A unique name called as the logon name.
  • The email address that comprises of the logon name and the domain name of the ISP. E.g.:- xyz@example.com
Where xyz is the logon name & example.com is the domain name.

What is Mail Client?


The mail client is a program in the computer that has access to the emails on the server like Outlook Express, MS Outlook, Mozilla Thunderbird and Apple mail, etc. It allows users to send, receiving and accessing emails through the browser as well as desktop.

There are 2 Kinds of Email Clients:


  1. Web Based Email Client: Web based email allow the user to access emails by web browsers such as Chrome, Firefox, etc. when you want to download emails; they are downloaded on the server and not in your hard disk. The emails remain on the server until you download them and once you do so the emails on the server are deleted.Examples: - Gmail, Yahoo mail, etc.
  2. Desktop Based Email Client: Desktop based email clients are the programs in your computer which you use to access your emails. In this you can save your emails on the hard disk and can utilize them in future. Examples: - MS Outlook, Thunderbird.


Difference B/W Web Based & Desktop Based Email Client


1 Default storage: In web-based email you can save your emails on the server and not on the desktop, whereas in desktop based email client you can save your emails on your hard disk and server.

2) Access to emails: Web based email client you cannot have access to your emails when you are offline. Whereas in desktop based mail client you can access your emails in offline mode also.

3) Size limit: There is usually a size limit in web based email client as the server can store emails up to some limit. Whereas you can store limitless data on your hard drives to save your emails.

4) Sending & receiving mails: In web based mail client you can send & receive mails, but you cannot send & receive mails in a desktop based client in case offline.

Detailed Information About Mail Protocols


In order to work with your email you need use a mail client to access a mail server. Generally Protocols are the rules for interacting between a mail server and a mail client. Some of the most used protocols are discussed below:

There are Mainly 4 Types of Protocols


1) POP3 (Post Office Protocol): It is a widely used protocol used for retrieving mails from the server. In this the mails are stored on the server till the time you have not downloaded them.

As soon as you download the mails, the client signals the server to delete the server’s copy. Microsoft Outlook uses POP3 protocol.

2) SMTP (Simple Mail Transfer Protocol): SMTP is responsible for sending all the emails. But these emails are infected with viruses. Thus to prevent spam and fraudulent the ISP have put restrictions on using SMTP servers. Methods for detecting authorized users:
  • Configuration of SMTP server to receive emails from computers that are connected to modem, cable, etc.
  • Use the sender’s address and rejection of all the emails from other addresses that haven’t been hosted by ISP.
  • Use the same logon name and password as that of POP3 to access SMTP.
  • POP3 before SMTP i.e. first log in with POP3 and then access to SMTP for some time is given.
3) IMAP (Internet Message Access Protocol): It has the same function as that of POP3 but varies in the fact that by default keeps a copy of the received email on the server. When you delete an email, you are deleting both the local copy and the server copy. Thus to prevent accidental deletion it has got a purge command and undelete command.
  • Advantage: As compared to POP3, IMAP gives you the advantage of working on your emails anytime & anywhere. You can also arrange the emails in an organized manner.
  • Disadvantage: Since the ISP provide a limited amount of space in a mailbox; the IMAP mailbox will fill quickly than a POP3 mailbox.
4) HTTP (Hyper Text Transfer Protocol):  The most common email provider which uses HTTP is MS Outlook. It works in the same manner as IMAP; saves the email to the client & on the server as well. But the only way in which it differs from IMAP is that it does not have purge option or undelete option. You can retrieve your deleted messages by dragging it back to the inbox.

Conclusion: All the basic concepts related to emailing process are discussed above. By reading the entire article you will able to identify what is an email client, email server and email protocols, etc. If you like the above listed information then share your experience through putting a comment below. Or if you have any query related to the post, then discuss your query through comments we will be happy to help you :)

Sunday, December 7, 2014

Guide on How to Block Popup Windows in Mozilla Firefox

Mozilla Firefox is a free and most popular web browser widely used in the world. A lot of reasons are there for why user preferred it as default web browser such as:  fast speed, reliability and support several plugins or add-ons, etc. 


But sometimes many dissimilar pop-ups start showing in your browser and how to block popup windows in Mozilla Firefox become a query of your’s. Don’t worry now I am going to explore an easy way to block pop-up Ads forever. But before moving on the process, you should know about basic concepts like what is Popup and how it can harm you.

Get Brief Info About Pop-ups

Pop-ups are windows that come into sight automatically without your authorization while you are browsing through internet. Some Pop-ups appear on the top of  Firefox windows while other open underneath Firefox that are also called Pop-unders.

They contrast in size, but never cover the entire screen. Still Pop-ups can break your concentration during an important work. That’s why we start wondering how to block popup windows in Mozilla Firefox.

Know How to Block Popup Windows?


It is very simple to stop or block popups from Firefox Windows for forever. Because Mozilla Firefox allows you to control or block Pop-unders and Pop-ups the “content” section in the Options Windows as shown in below steps:


1) You will see “Options” automatically while Pop-ups come on the screen

avoid windows pop-ups

2) If you want to get this option manually, then Click on “Tools” from menu bar >> Choose “Options”

How to Block Popup Windows in Mozilla Firefox


3) Go to “Content” panel >> Check the box “Block Pop-up windows and click “OK” button to finish the procedure.

stop showing pop-ups ads 

 What If Pop-ups Not Being Blocked?


1) Click on Exceptions >> Select list of websites for that you want to allow display Pop-ups. 

how to stop pop-ups

2) You will get 3 different options (allow, Remove site, remove all sites)

block popup windows

  • Allow:  Add websites to show pup-ups
  • Remove Site: To remove selected websites from the list
  • Remove all Sites: To remove all websites from the list at once

3) Click on Remove all sites, then press close.

how to stop pop-ups on Mozilla

Conclusion:

All the above suggested steps are helpful for blocking Popup Windows in Mozilla Firefox. Still pop-ups are showing then remove all Add-ons and re-start the browser. I hope you will be able to sort out your query how to block popup windows in Mozilla Firefox by using suggested solution. So put a comment if you want to share your experience with the post or want to ask any query related to the post.

Friday, December 5, 2014

How to Run Two Whatsapp Accounts on Android Without Root


In the past few years, many companies released dual SIM cards, phone after seeing a huge demand for it. And few of dual SIM phone users tries to create 2 WhatsApp profiles for both numbers and thus a query generated that How to run two WhatsApp accounts on Android without root. So before moving on solution for this query you have to be aware about WhatsApp messenger.


A Brief Intro about WhatsApp Messenger!

WhatsApp is a most popular and easy to use messenger. It allows a user to send images, videos and chats through Mobile phone to another user who is also using  whatsapp. Now it's become a need for new generation users to communicate with their friends, relatives and colleagues. You can also hide last seen on whatsaap in Windows phones, Android phones and iPhones. So I am going to disclose a useful trick that will show you how to use two whatsapp accounts on one phone.

What you will need for The Process?

  1. An Android phone (dual SIM) that you are using for the official WhatsApp.
  2. OGWhatsApp.apk which you can be downloaded free of cost by a simple Google search.

Know How to Run two WhatsApp Accounts on Android without Root:


1) In the very first step, take backup of your WhatsApp data. 

Open WhatsApp >>Settings >> Chat settings, then select “backup conversation”option.


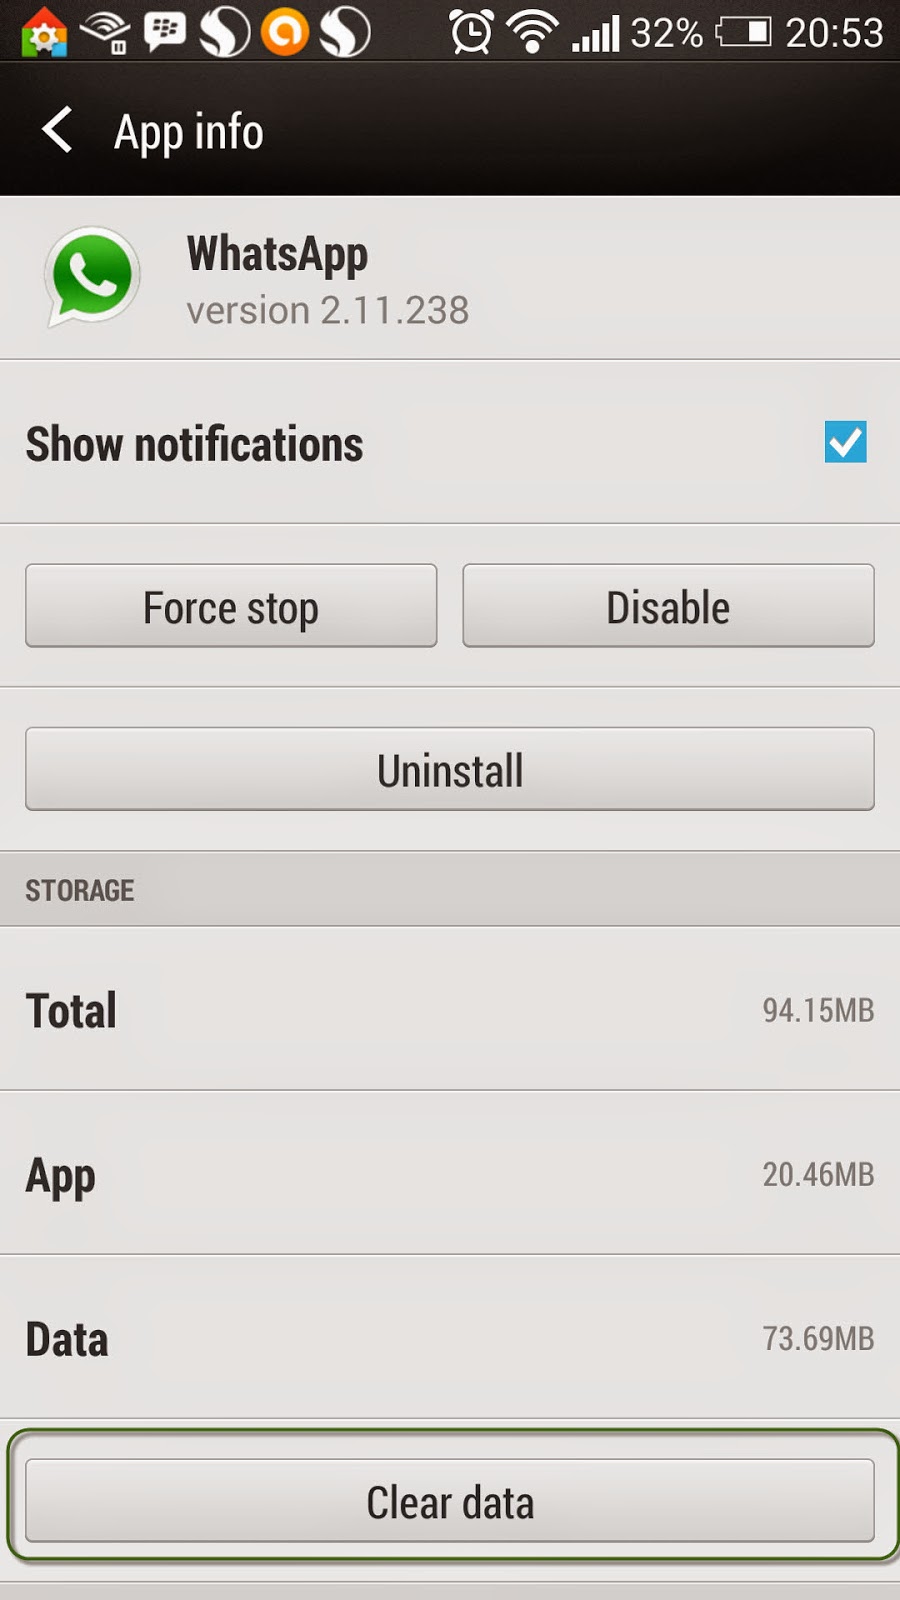
2) Now go to app setting >> Clear the official WhatsApp data. 

Move to WhatsApp app info and scroll down and select “clear data


3) Now go to your file manager >> rename the “WhatsApp” folder with the name “OGWhatsApp

4) Download a free application “OGWhatsApp.apk” and install on your Android phone.


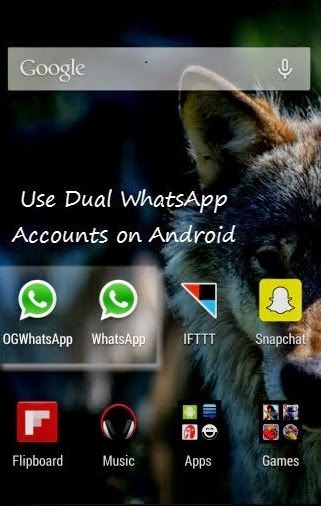
5) Now you will see two WhatsApp accounts on your Android phone and you can register one more extra number on WhatsApp without having to root your dual SIM Android phone.


Conclusion: Above suggested method is fully helpful to explore how to run two whatsapp accounts on android without root. So apply all these steps and use two whatsapp accounts from your single dual SIM Android phone. I hope you got the right solution for your query still you have any doubts or unable to execute above listed steps then put a comment below. Also share your experience with this method or any suggestions related to the topic.